1. Module类

Behind the scenes, PyTorch overrides the __setattr__ function in nn.Module so that the submodules you define are properly registered as parameters of the model.

1
2
3
4
5
6
7
8
9
10
11
12
13
14
15
16
17
18
19
20
21
class MyModule:
def __init__(self, n_in, nh, n_out):
self._modules = {}
self.l1 = nn.Linear(n_in,nh)
self.l2 = nn.Linear(nh,n_out)

# 当设置属性值时会被调用
def __setattr__(self,k,v):
if not k.startswith("_"):
self._modules[k] = v
# 重写了 __setattr__ 方法后,你会屏蔽掉 Python 默认的属性赋值机制。
# 为了保持类的正常功能(比如能够添加新属性、修改现有属性等),你需要显式调用基类的 __setattr__ 方法,以保证除了你的自定义操作外,正常的属性赋值也能够发生。
super().__setattr__(k,v)

def __repr__(self):
return f'{self._modules}'

def parameters(self):
for l in self._modules.values():
# yield from: 用于从一个生成器中产生所有值,迭代一个对象的参数,并将它们一个接一个地返回
yield from l.parameters()

Registering modules

1
2
3
4
5
6
7
8
9
10
11
12
13
14
15
layers = [nn.Linear(m,nh), nn.ReLU(), nn.Linear(nh,10)]

class Model(nn.Module):
def __init__(self, layers):
super().__init__()
self.layers = layers
for i,l in enumerate(self.layers):
self.add_module(f'layer_{i}', l)

def forward(self, x):
# reduce() 至少需要两个参数:一个函数和一个可迭代对象,还可以接受第三个参数,即初始化器。
# nn.ModuleList does this for us
return reduce(lambda val,layer: layer(val), self.layers, x)

model = Model(layers)
  • module中的__getattr中有三个魔法函数,其有三个成员变量分别是_parameters_buffers(统计量)和_modules
1
2
3
4
5
6
7
8
9
10
11
# 实例化模型后,参数已初始化
test_module = Net()
# 返回模型中各个模块层(不包含子层),返回的是有序字典,与named_children()区别,其返回的是元组
test_module._modules
# 打印模块自身的Parameters、buff对象,不包括其中各个子模块
test_module._parameters
test_module._buffers

# named_modules()不仅返回自身模块还返回各个子模块
for p in test_module.named_modules():
print(p)
1
2
3
4
5
6
7
8
9
10
11
12
13
14
15
16
17
18
19
20
21
22
23
24
25
26
27
28
29
30
31
32
33
34
35
36
37
38
39
40
41
42
43
44
45
46
47
48
49
50
51
52
53
54
55
56
57
58
59
60
61
62
63
64
65
66
67
68
69
70
71
72
73
74
75
76
77
78
79
80
81
82
# 补充:model.modules(), model.children(), model.named_children(), model.parameters(),model.state_dict()
# 作用及区别
import torch
import torch.nn as nn

class Net(nn.Module):

def __init__(self, num_class=10):
super().__init__()
self.features = nn.Sequential(
nn.Conv2d(in_channels=3, out_channels=6, kernel_size=3),
nn.BatchNorm2d(6),
nn.ReLU(inplace=True),
nn.MaxPool2d(kernel_size=2, stride=2),
nn.Conv2d(in_channels=6, out_channels=9, kernel_size=3),
nn.BatchNorm2d(9),
nn.ReLU(inplace=True),
nn.MaxPool2d(kernel_size=2, stride=2)
)

self.classifier = nn.Sequential(
nn.Linear(9*8*8, 128),
nn.ReLU(inplace=True),
nn.Dropout(),
nn.Linear(128, num_class)
)

def forward(self, x):
output = self.features(x)
output = output.view(output.size()[0], -1)
output = self.classifier(output)

return output

model = Net()

# 1. model.modules()
# 迭代遍历模型的所有子层,在本文的例子中,Net(), features(), classifier()
# 以及nn.xxx构成的卷积,池化,ReLU, Linear, BN, Dropout
# 也就是model.modules()会迭代的遍历模型的所有子层 len(model_modules): 15
model_modules = [x for x in model.modules()]
print(model_modules)

for layer in model.modules():
if isinstance(layer, nn.Conv2d):
pass

# 2. model.named_modules()
# 不但返回模型的所有子层,还会返回这些层的名字
# ('features.0', Conv2d(3, 6, kernel_size=(3, 3), stride=(1, 1)))
model_named_modules = [x for x in model.named_modules()]
print(model_named_modules)

# 返回层以及层的名字的好处是可以按名字通过迭代的方法修改特定的层
for name, layer in model.named_modules():
if 'conv' in name:
pass

# 3. model.children()
# 只遍历模型的子层,这里即是features和classifier,len(model_children): 2
model_children = [x for x in model.children()]
print(model_children) # [Sequential(), Sequential()]
# 修改特定层
model.classifier = nn.Sequential(*list(model.classifier.children())[:-1])

# 4. model.named_children()
# 不但迭代的遍历模型的子层,还会返回子层的名字
model_named_children = [x for x in model.named_children()]
print(model_named_children) # [('features',Sequential()), ('classifier',Sequential())]

# 5. model.parameters()、model.named_parameters()
# len(model_named_parameters):12
model_named_parameters = [x for x in model.named_parameters()]
print(model_named_parameters)

# model.state_dict()
# 返回一个有序字典,下例为使用预训练例子
pretrained_dict = torch.load(log_dir) # 加载参数字典
model_state_dict = model.state_dict() # 加载模型当前状态字典
pretrained_dict_1 = {k:v for k,v in pretrained_dict.items() if k in model_state_dict} # 过滤出模型当前状态字典中没有的键值对
model_state_dict.update(pretrained_dict_1) # 用筛选出的参数键值对更新model_state_dict变量
model.load_state_dict(model_state_dict) # 将筛选出的参数键值对加载到模型当前状态字典中
  • module中的state_dict方法
    1. 首先,通过_save_to_state_dict方法先将当前模块的parametersbuffers变量存入destination字典
    2. 然后,遍历self.modules.items()子模块,将每个子模块的parametersbuffers变量存入destination字典
    3. 最后返回destination字典中包含所有模型状态参数,OrderedDict[key, value]
1
2
3
4
5
6
7
8
9
10
11
12
13
14
15
16
17
18
19
20
21
22
23
24
25
26
27
28
29
30
31
32
33
34
>>> module.state_dict().keys()
['bias', 'weight']

# 将网络参数保存到path文件中,不包含网络图结构和优化器参数等部分
torch.save(test_module.state_dict(), path)

#———————————————————————————模型保存相关—————————————————————
# 保存网络参数和图结构,占用磁盘空间大
torch.save(test_module, path)

# 保存所有所有相关信息
EPOCH = 5
PATH = "model.pt"
LOSS = 0.4

torch.save({
'epoch': EPOCH,
'model_state_dict': net.state_dict(),
'optimizer_state_dict': optimizer.state_dict(),
'loss': LOSS,
}, PATH)

# 再次实例化,是因为上面torch.save中没有保存网络图结构,要先构建图结构再去加载参数
model = Net()
optimizer = optim.SGD(net.parameters(), lr=0.001, momentum=0.9)

checkpoint = torch.load(PATH)
# 传入字典对象
model.load_state_dict(checkpoint['model_state_dict'])
optimizer.load_state_dict(checkpoint['optimizer_state_dict'])
epoch = checkpoint['epoch']
loss = checkpoint['loss']


  • module中的parameter方法

    1. 注意parameter_parameters 区分,前者返回的是迭代器,包括当前模块和各个子模块的参数。后者返回的是当前模块中的参数。
    2. 其中会执行named_papameters 最终返回的是个迭代器对象[key, value]
    1
    2
    >>> for p in test_module.named_parameters():
    print(p)
  • module中的train 方法

    dropoutbatchnorm 都继承了Module类,都属于模型的子模块,当把模型设置为训练模式和验证模式时,相应的子模块也会设为对应的训练或验证模式

2. 自动微分Forward与Reverse模式

  • Forward计算流程

forward

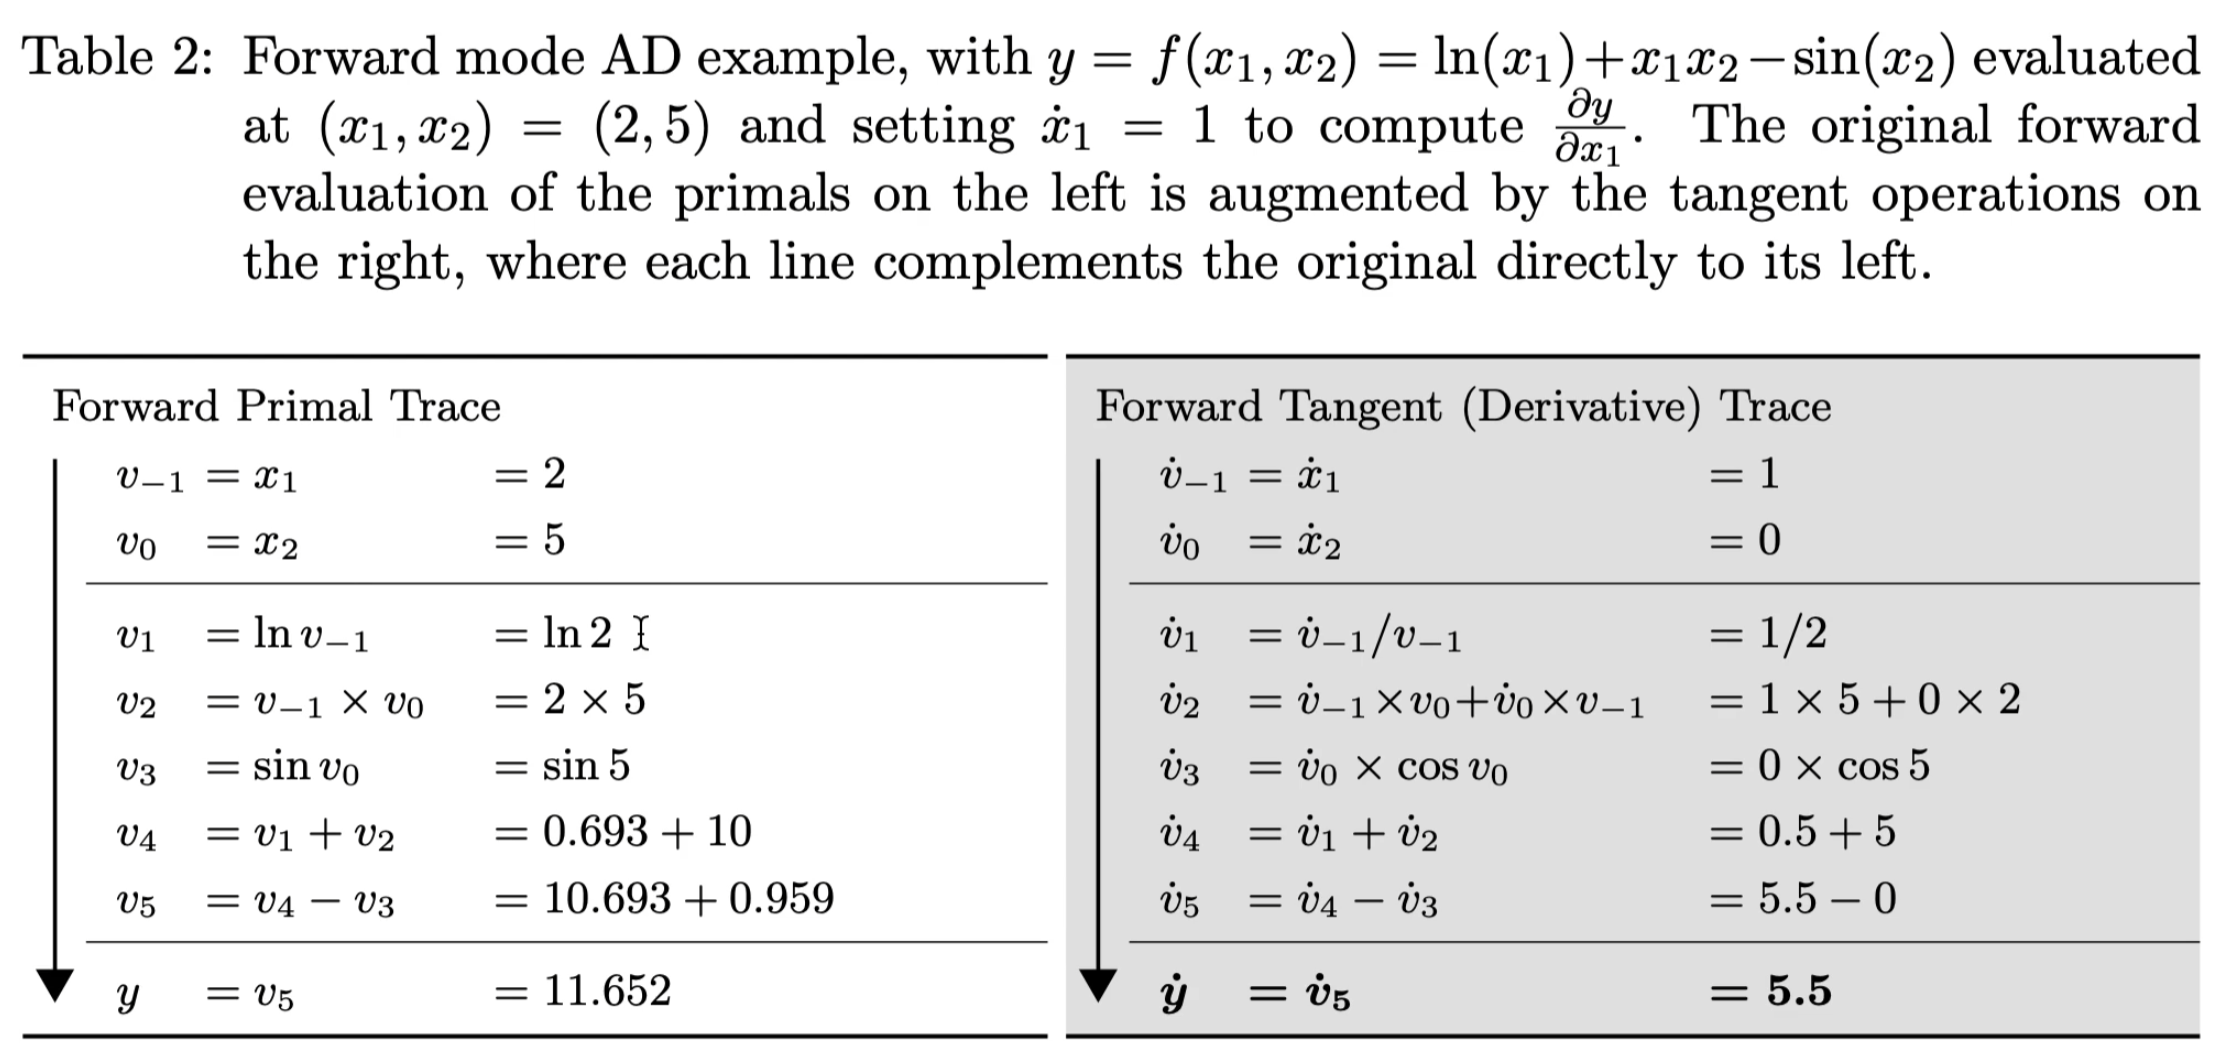
特点: 前向计算过程中当前节点相对某个输入结点的梯度可计算得到;每次只能得到一个输入节点的导数如图中的x1

  • Reverse计算流程

reverse

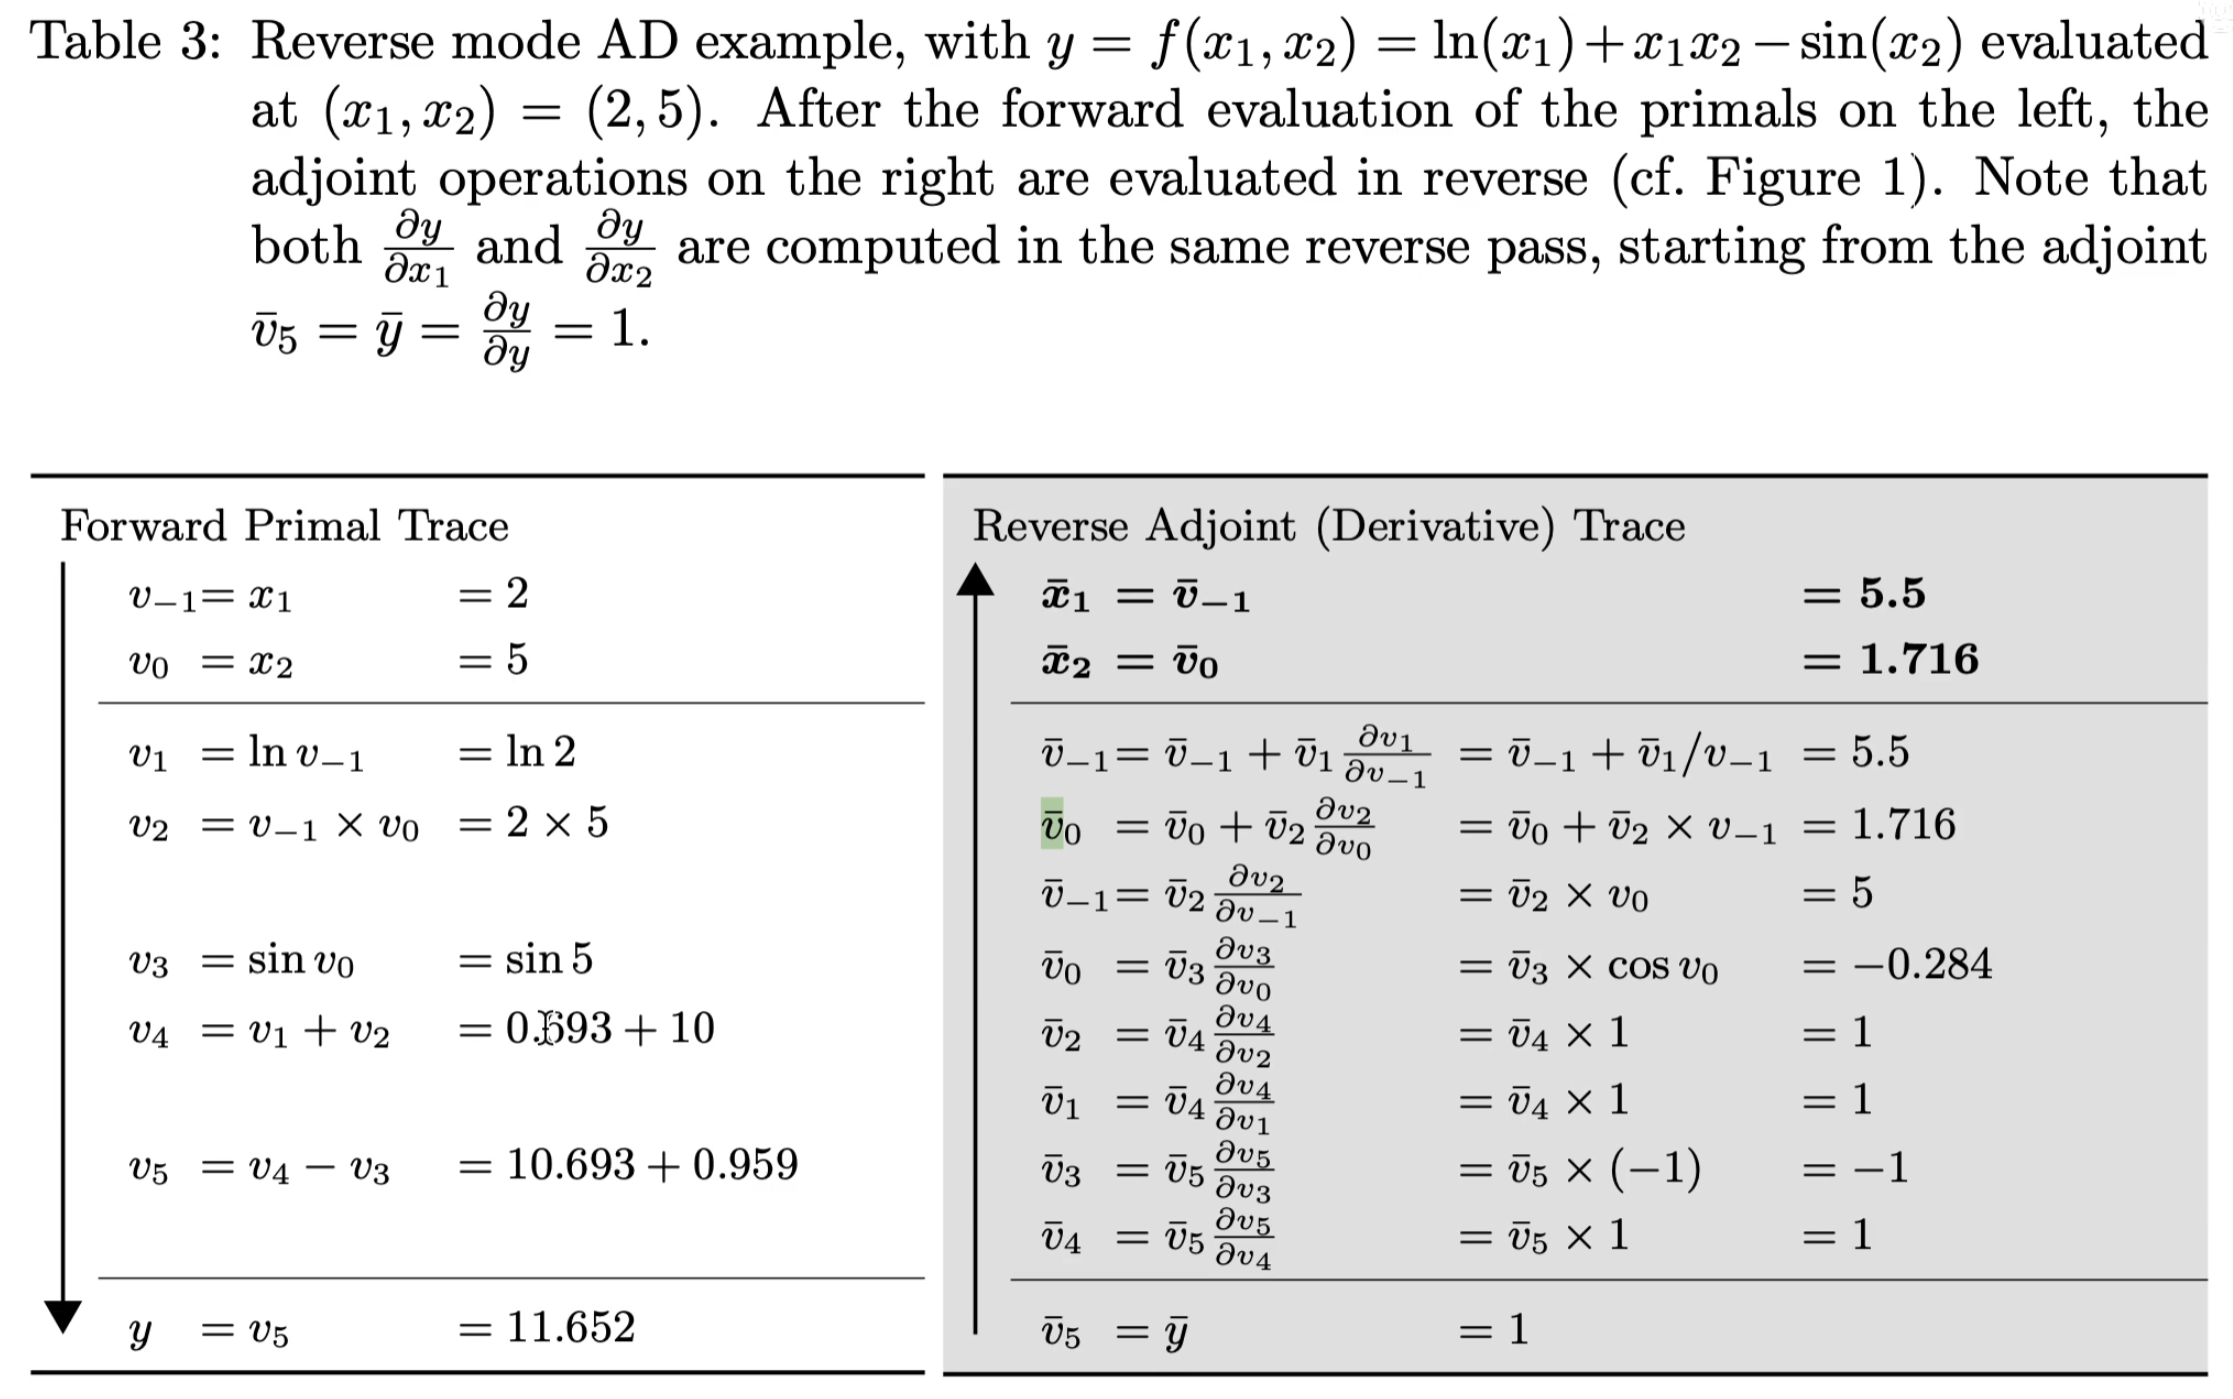
特点: 反向计算过程中需要等待前向计算结束;一次性可以算出所有节点导数

图片出处:Automatic Differentiation in Machine Learning: a Survey

3. 算子融合

1
2
3
4
5
6
7
8
9
10
11
12
13
14
15
16
17
18
19
20
21
22
23
24
25
26
27
28
29
30
31
32
33
34
35
36
37
38
39
40
41
42
43
44
45
46
47
48
49
50
51
52
53
54
55
56
57
58
59
60

import torch
import torch.nn as nn
import torch.nn.functional as F

in_channels = 2
out_channels =2
kernel_size = 3
w = 9
h = 9

x = torch.ones(1, in_channels, h, w)
conv3 = nn.Conv2d(in_channels, out_channels, kernel_size, padding="same")
conv1 = nn.Conv2d(in_channels, out_channels, 1) # [2,2,1,1]
result1 = x + conv3(x) + conv1(x)
print(result1)

# ——————————————————————--————将1*1卷积转为3*3——————————————————————————————————————

# pad填充方式从里到外,每个维度都有上下和左右两个方向,四个1分别对应左右S上下填充0的个数
# [2,2,1,1] -> [2,2,3,3]
conv1_to_conv3 = F.pad(conv1.weight, [1,1,1,1,0,0,0,0])

# 实例化卷积
conv1_3 = nn.Conv2d(in_channels, out_channels, kernel_size, padding="same")

# 将卷积参数用1*1填充后的参数替代,weight是parameter类,要用nn.Parameter()包装
conv1_3.weight = nn.Parameter(conv1_to_conv3)
conv1_3.bias = conv1.bias

#--------------------------------如何将输入x本身化为3*3卷积表示—————————————————————————————————
#------------------------1. 必须是1*1的卷积不考虑相邻点融合--------------—————————————————————
#-------------------—2. 不考虑通道间的融合(只有一个通道中含有非0数)----------------------------

# zeros:不考虑通道之间影响 channel:不考虑相邻点影响 weight[2,2,3,3]:共四个3*3矩阵
zeros = torch.unsqueeze(torch.zeros(kernel_size, kernel_size), 0)
channels = torch.unsqueeze(F.pad(torch.ones(1, 1), [1,1,1,1]), 0)

# 对应第一个通道卷积核
channel_zeros = torch.unsqueeze(torch.cat([channels, zeros], 0), 0)

# 对应第二个通道卷积核
zeros_ channel= torch.unsqueeze(torch.cat([zeros, channels], 0), 0)

identity_conv_weight = torch.cat([channel_zeros, zeros_ channel], 0)
identity_conv_bias = torch.zeros([out_channels])

convx_3 = nn.Conv2d(in_channels, out_channels, kernel_size, padding="same")
convx_3.weight = nn.Parameter(identity_conv_weight)
convx_3.bias = nn.Parameter(identity_conv_bias)

result2 = conv3(x) + conv1_3 + convx_3
print(result2)

#--------------------------------融合—————————————————————————————————
conv_fusion = nn.Conv2d(in_channels, out_channels, kernel_size, padding="same")
conv_fusion.weight = nn.Parameter(conv3.weight.data + conv1_3.weight.data + convx_3.weight.data)
conv_fusion.bias = nn.Parameter(conv3.bias.data + conv1_3.bias.data + convx_3.bias.data)
result3 = conv_fusion(x)
print(torch.all(torch.isclose(result2, result3)))

4. Hooks机制

Pytorch提供的hooks机制能让用户可以往计算流中的某些部分注入代码,一般来说这些部分无法直接从外部访问。其中主要有两种hooks,一种是添加到张量上的hooks,另一种是添加到Module上的hooks。

4.1 添加到张量上的hooks

这些添加的hooks能够让用户在反向传播的过程中访问到计算图中的梯度。
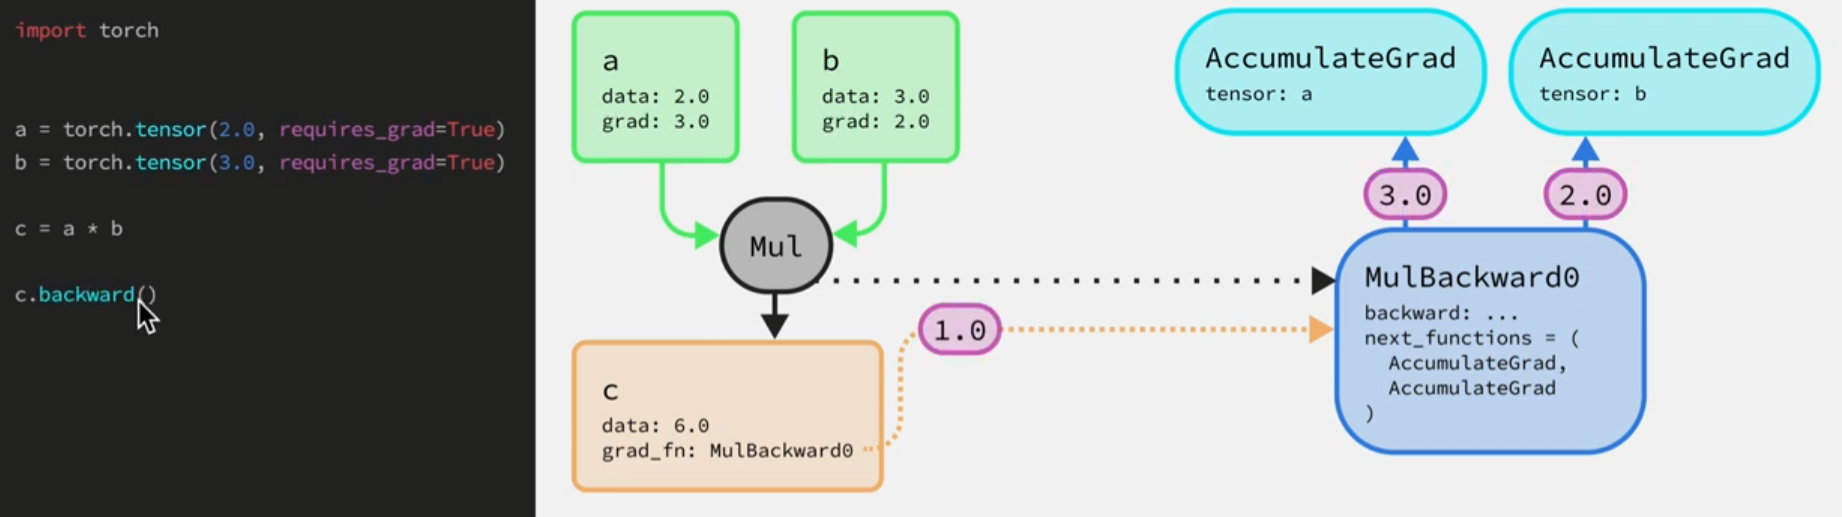
下面先来看看反向传播的一个具体例子。

image-20220523195647470

  • 当我们将张量ab相乘的同时也在构建后向图,即创建了一个名字是MulBackward0的节点(其中next_functions表示梯度接下来要传递的到哪些节点即操作的输入),还有两个AccumulateGrad节点(将反向传播过程中对应张量的梯度作累加)。最后得到的梯度值将保存到叶子张量上(绿框)。

  • 张量c属于中间节点,其中grad_fn属性指向后向图中的MulBackward0节点,c.backward()就是对应这个过程将起始梯度传给MulBackward0节点。然后再将该梯度传给MulBackward0节点中的backward函数(本质就是将输入梯度乘对应值得到输入张量的梯度)。本例中前传a*32*b所以此节点对应张量ab的梯度为3,2。

    最后要将输出梯度1分别乘3,2得到输入梯度,然后传递给abAccumulateGrad节点来累加梯度,该节点将最终的梯度赋值给对应张量的grad属性。

以上整个过程一旦调用了.backward()反向传播过程中中间节点所产生的梯度(红框)都是无法访问到的,无法打印、修改,用户只能查看反向回传完之后叶子节点上的梯度。

hooks的作用在于能够让用户访问到反向传播过程中的梯度张量,同时可以修改这些梯度值。


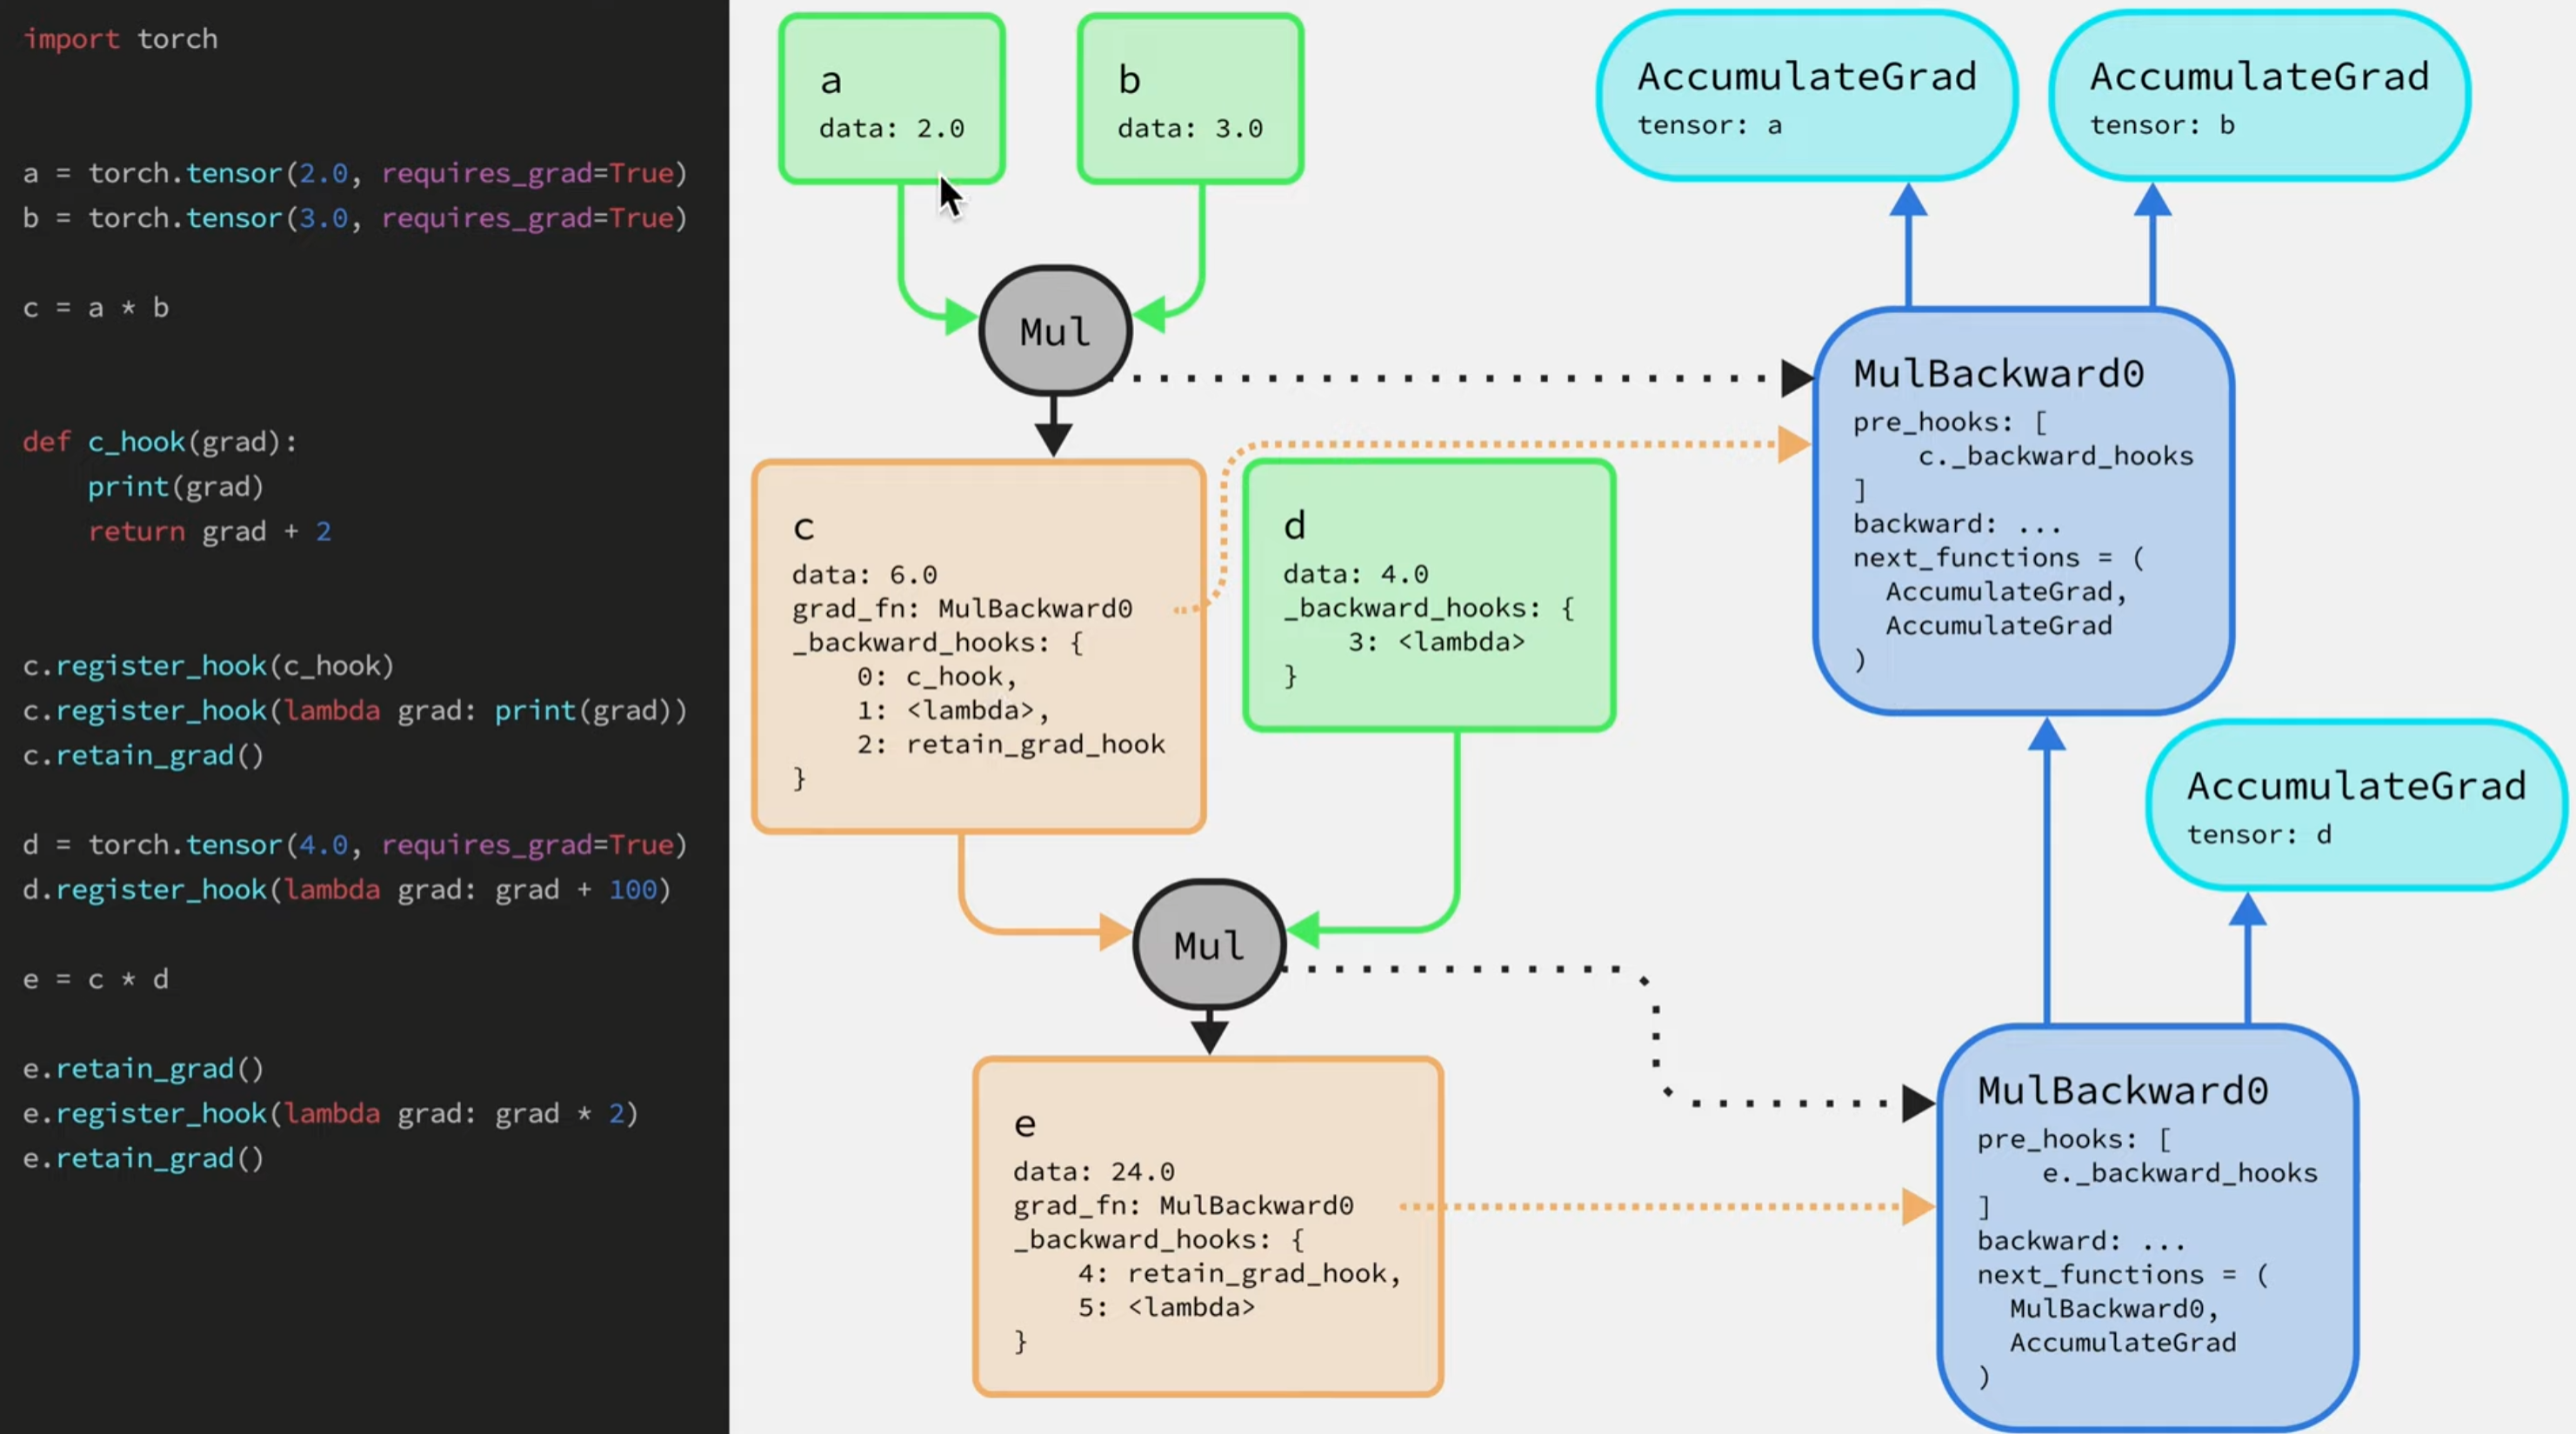
我们给中间的张量都添加hooks看看计算图会有什么变化

image-20220523204413424

  • 第一个添加的hook: c.register_hook中传入了一个函数c_hook,该函数有一个参数表示梯度,并可以返回一个新梯度。当向张量c注册这个hook函数,首先它会被添加到张量c_backward_hooks(是个有序字典,添加hook函数的顺序很重要,反向传播中会按照之前添加的顺序调用)。

  • 如果用户想让梯度保存在某个中间节点的话,需要调用中间节点的retain_grad函数(默认情况下,只有叶子节点会保存梯度值)。在调用此函数后,会往_backward_hooks字典中注册retain_grad_hook函数,当该函数被调用,传给它的梯度值会保存到中间张量的grad属性上。

  • **需要注意的是反向传播过程中hook系统是如何工作的,往中间节点和叶子节点上添加hook是有区别的。**当往叶子节点添加hook函数,该函数就只是被添加到_backward_hooks字典中。而往中间节点添加hook函数的同时,所有在反向图中关联了该中间向量的节点都会被通知,上图中MulBackward0节点关联了张量c,即将_backward_hooks字典添加到MulBackward0节点的pre_hooks列表中,这些列表中函数都会在梯度被传递给backward函数前被调用。

    在注册好所有hook函数后,过一遍反向传播过程。

image-20220523220453700

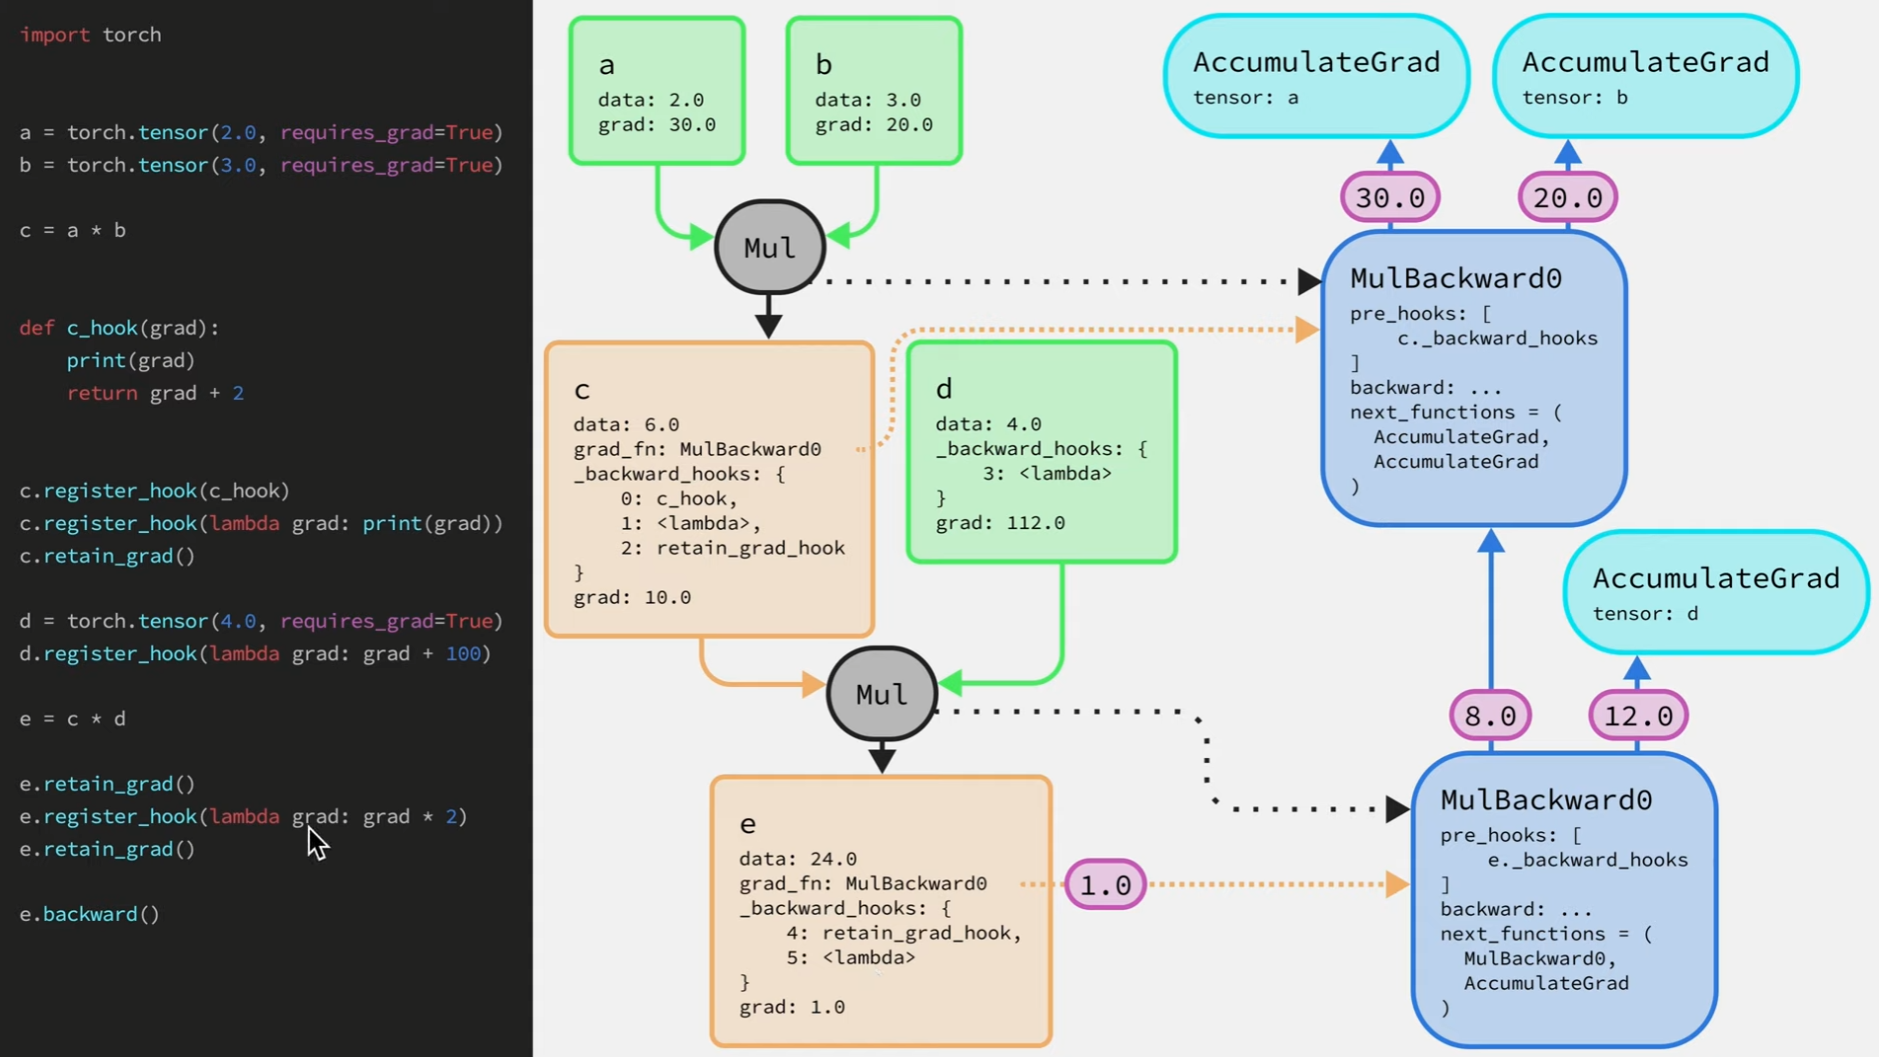
流程:1.0->MulBackward0->pre_hooks->_backward_hooks->将梯度2->backward->8,12(12会被传递给叶子张量d的AccumulateGrad节点,同时该节点会检查其所关联的张量是否有注册backward_hooks,如果注册了(d中注册了,a,b未注册),该节点会把梯度传给这些注册的hook函数处理,然后再保存到张量的grad属性上)->梯度10->backward-> …

image-20220523221008946

h.remove()可以将hook函数从保存它的_backward_hooks字典中移除,如上图在调用e.backward之前调用了h.remove,那么在反向传播中这个c_hook函数就不会被调用,另外要注意的是,在这些hooks函数中不要对梯度张量本身做任何修改,即不要对输入梯度做inplace操作如grad *= 100。原因是这个梯度有可能同时被传递给后向图中其他节点。

4.2 Module上的hooks

  • Module上的hooks函数是在forward函数调用之前或之后被调用的。下面例子实现了一个SumNet模块,其forward函数是将三个张量相加并返回结果。
1
2
3
4
5
6
7
8
9
10
11
12
13
14
15
16
17
18
19
20
21
22
23
24
25
26
27
28
29
30
31
32
33
34
35
import torch
import torch.nn as nn

class SumNet(nn.Module):
def __init__(self):
super(SumNet,self)._.init__()

@staticmethod
def forward(a,b,c):
d = a + b + c
return d

def forward_pre_hook(module,inputs):
a,b = inputs
return a + 10,b

#此处inputs参数是forward_pre_hook函数的返回值input(11,2),output的输出会覆盖forward函数中返回的输出,即116
def forward_hook(module,inputs, output):
return output + 100

def main():
sum_net = SumNet()

# 往模块注册在forward之前调用的hook函数,执行完该函数后,会将更新后的a=11, b=2, c=3输入forward函数,并返回d=16
sum_net.register_forward_pre_hook(forward_pre_hook)
#注册在forward之后调用的hook函数
sum_net.register_forward_hook( forward_hook)

a = torch.tensor(1.0,requires_grad=True)
b = torch.tensor(2.0,requires_grad=True)
c = torch.tensor(3.0,requires_grad=True)

#a, b作为位置参数传入,c作为 关键字参数传入
d = sum_net(a,b,c=c)
print( 'd: ', d) #116
  • 和往张量上注册hooks函数一样,同样可以用一个变量来保存注册hooks函数时的返回值,即hook函数的句柄(handle to the hook),这样方便后面移除hook
1
2
3
4
5
6
7
8
9
10
11
12
13
14
15
16
17
18
def main():
sum_net = SumNet()

forward_pre_hook_handle = sum_net.register_forward_pre_hook (forward_pre_hook)
forward_hook_handle = sum_net.register_forward_hook(forward_hook)

a = torch.tensor(1.0,requires_grad=True)
b = torch.tensor(2.0,requires_grad=True)
c = torch.tensor(3.0,requires_grad=True)

d = sum_net(a,b,c=c)
print( 'd: ', d) #116

forward_pre_hook_handle.remove()
forward_hook_handle.remove()

d = sum_net(a,b,c=c)
print( 'd: ', d) #6
  • Module还有另一种hook,即backward_hookregister_backward_hook(backward_hook)

    1
    2
    3
    4
    5
    # args:实例、输入梯度、输出梯度
    def backward_hook(module,grad_input,grad_output):
    print('module:', module)
    print('grad_input:',grad_input)
    print('grad_output:',grad_output)

    PyTorch Hooks Explained - In-depth Tutorial

5. einsum

基本规则:

  • 在不同输入之间重复出现的索引表示,把输入张量沿着该维度做乘法操作。如"ik,kj->ij"k 在输入中重复出现,所以就是把 ab 沿着 k 这个维度作相乘操作

    1
    2
    3
    4
    5
    6
    7
    8
    9
    10
    11
    12
    13
    14
    15
    16
    17
    18
    19
    20
    import torch 
    '''
    a, b:
    (tensor([[6, 0, 5],
    [6, 4, 8]]),
    tensor([[6, 5, 2, 3, 1],
    [4, 8, 1, 8, 5],
    [0, 6, 7, 6, 7]]))
    c:
    tensor([[[36, 30, 12, 18, 6],
    [ 0, 0, 0, 0, 0],
    [ 0, 30, 35, 30, 35]],

    [[36, 30, 12, 18, 6],
    [16, 32, 4, 32, 20],
    [ 0, 48, 56, 48, 56]]])
    '''
    a= torch.randint(low=0, high=10, size=(2, 3))
    b= torch.randint(low=0, high=10, size=(3, 5))
    c = torch.einsum('ik,kj->ikj', a, b)
  • 只出现在一边的索引,表示中间计算结果需要在这个维度上求和

    1
    2
    3
    4
    5
    '''
    d: tensor([[ 36, 60, 47, 48, 41],
    [ 52, 110, 72, 98, 82]])
    '''
    d = torch.einsum('ik,kj->ij', a, b)
  • 等式 右边的索引顺序可以是任意的,比如上面的"ik,kj->ij"如果写成 "ik,kj->ji",那么就是返回输出结果的转置,用户只需要定义好索引的顺序。

特殊规则:

  • 可以不写包括箭头在内的右边部分,那么在这种情况下,输出张量的维度会根据默认规则推导。就是把输入中只出现一次的索引取出来,然后按字母表顺序排列,比如上面的矩阵乘法 “ik,kj->ij” 也可以简化为 “ik,kj”。
  • 支持"..."省略号,用于表示用户并不关心的索引。
1
2
3
4
5
6
7
8
9
10
11
12
13
14
15
16
17
18
19
20
21
22
23
24
import torch

a = torch.rand(2)
b = torch.rand(3)

# Out product
out = torch.einsum("i,j->ij", a, b)

x = torch.rand((2, 3))
v = torch.rand((1, 3))

# Summation
torch.einsum("ij->", x)

# Matrix-Vector Multiplication, just specify the demensions as we would like
torch.einsum("ij,kj->ik", x, v)

# Matrix-Matrix Multiplication
torch.einsum("ij,kj->ik", x, x)

# Batch Matrix Multiplication
Z1 = torch.rand((2, 5, 3))
Z2 = torch.rand((2, 3, 4))
torch.einsum("ijk,ikl->ijl", z1, z2)